Google Pay lets you activate UPI using Aadhaar: Here’s how it works | Digit
Google Pay has UPI as a mode of payment. You can send and receive money via UPI on Google Pay. But, up till now, as part of the UPI activation on Google Pay, you had to enter your debit/ATM card information to verify your UPI-associated bank account. Now, you can authenticate the bank account and complete the UPI activation using your Aadhaar number.
Let’s see how that works.
Steps to verify your UPI-linked bank account on Google Pay using Aadhaar
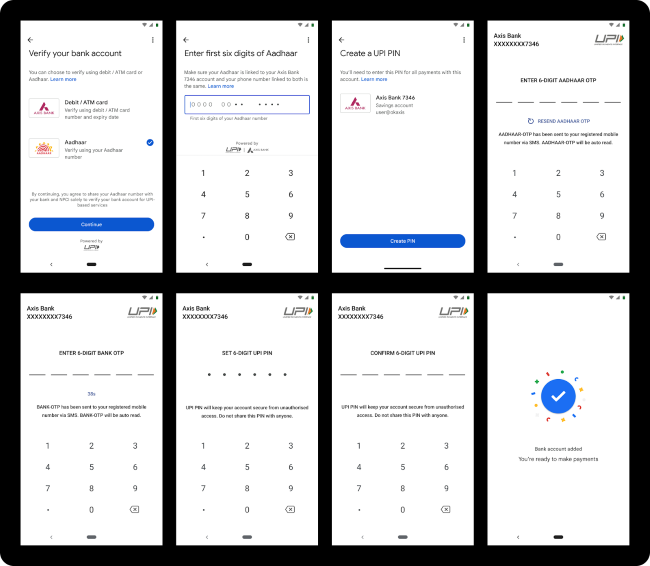
1. Open Google Pay, and as part of the setup process, enter the mobile number linked to your bank account that you want to use for UPI.
2. Validate the phone number by entering the OTP you receive over SMS on your phone.
You will also be asked to set a new Google PIN for restricting unauthenticated access to Google Pay and other sensitive information within the app.
3. Next you will have to add a bank account in Google Pay. Ensure this bank account supports UPI. You can add it by pressing the profile icon on the top right corner of the Google Pay home screen.
4. Press on Bank account and then tap on Add bank account. Click on your bank from the list.

5. Now, you can choose between the Debit/ATM Card or the Aadhaar option. Selecting the latter, you will have to enter the first 6 digits of your Aadhaar number.
6. Submit the OTPs you received from UIDAI (the body behind Aadhaar) as well as the bank.
7. As per Google, the rest of the process will be handled by the bank. You will have to enter the UPI PIN whence asked.
Once UPI gets activated, you can send and receive money over this mode via Google Pay.
For all the latest Technology News Click Here
For the latest news and updates, follow us on Google News.

