How the Mac can help untangle the USB-C cable conundrum
A cable with a USB-C plug at one or both ends often reveals little about what it’s capable of doing. Despite guidelines for labeling set by the USB-IF (the USB trade group) and Intel’s Thunderbolt division, you can wind up with multiple USB and Thunderbolt cables and adapters without a great idea of what they do.
USB 2.0 and 3.0’s Type-A connector and Thunderbolt 1 and 2’s Mini DisplayPort-like plug offered fewer options. The biggest difference was between USB 2.0 and 3.0—but you could quickly tell if your hard drive was constrained to the 480 Mbps speed of USB 2 or operating under the higher 5 Gbps overhead of 3.0.
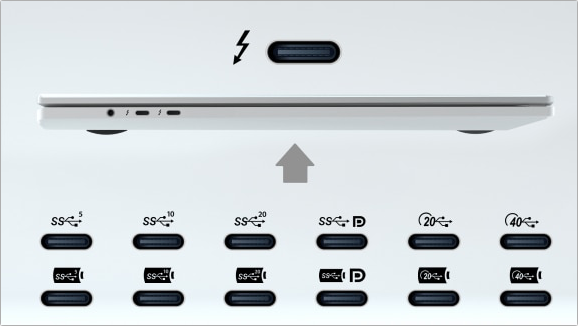
But with USB-C and Thunderbolt 3 (and now Thunderbolt/USB 4), it’s more confusing since they use the same connector. Just look at the following illustration about USB-C options created by Intel to inspire positive feelings about Thunderbolt and tell me that it fills you with information rather than dread.

If a cable is properly marked with that arcane symbology, you might be able to sort out the parameters. For instance, the SS10 label for SuperSpeed 10 Gbps is straightforward: it’s a USB standard (USB 3.2 Gen 2), and it operates at up to 10 Gbps. The Thunderbolt controller in any Mac with Thunderbolt 3 or 4 is backward compatible with that data rate and standard, too. (A “controller” is the hardware module that handles communications and negotiates compatible standards and throughput rates.)
If a cable lacks proper identification (as most do), you can connect it to your Mac to find out what it can do—as long as you have a device on the other end with parameters you know about, like its interface and maximum protocol speed.
It’s tricker to discover the power limits of a USB-C cable. You may require an app or even extra hardware.
Find the data rate
Plug one end into a Mac and the other end into an SSD or hub that you know the details of. For instance, you have a Thunderbolt SSD drive that is rated at 40 Gbps and plug it in to your Mac using an unknown cable with USB-C connectors on both ends. (If there’s a lightning bolt and the number 3 or 4 under it, it should be a Thunderbolt 3 or 4 cable, which are essentially identical for Thunderbolt devices.)
A cable with USB-C on at least one end can be capable of:
- USB 3.2 Gen 1 (SS5 or SuperSpeed 5 Gbps): With a USB-C to USB Type-A cable or adapter, you may only be able to pass up to 5 Gbps. (Formerly known as USB 3.0 and 3.1 Gen 1.)
- USB 3.2 Gen 2 (SS10 or SuperSpeed 10 Gbps): With both ends sporting USB-C, 10 Gbps is the top potential speed; if one tip is a USB Type-A connector, it might transfer at rates up to 10 Gbps. (Formerly known as USB 3.1 Gen 2.)
- USB 3.2 Gen 2×2 (SS20 or SuperSpeed 20 Gbps): While some cables support this faster USB 3.2 standard, Apple doesn’t. If you have an SSD or RAID with USB 3.2 Gen 2×2 and the appropriate cable, Apple devices will still report they can handle only up to 10 Gbps.
- Thunderbolt 3 and Thunderbolt 4: Up to 40 Gbps.
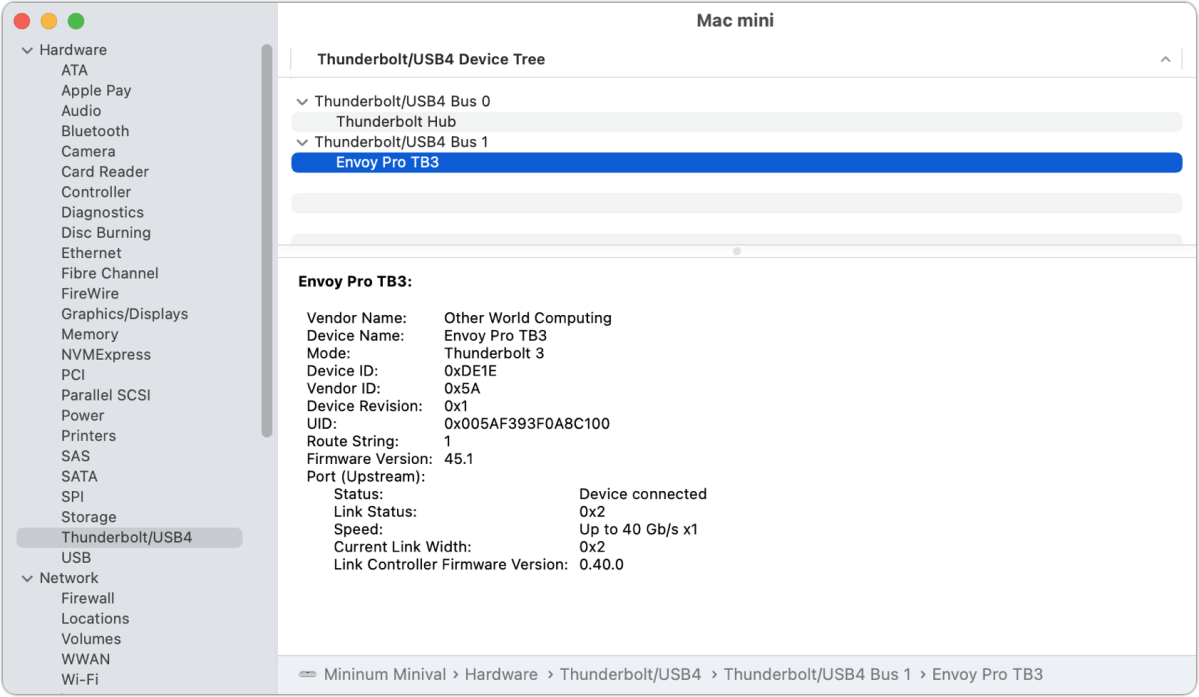
With knowledge of the speed of a peripheral and your unknown cable, plug it into your Thunderbolt 3 or 4 capable Mac. Now hold down the Option key and choose > System Information. In the left-hand navigation list, you can click Thunderbolt (or “Thunderbolt/USB4”) or USB to see items connected to the various internal buses. Macs have multiple buses, sometimes as many as one for each port. (A “bus” is the technical name for any data pathway. Each peripheral bus can support a separate full-speed data connection for the standards it manages.)

I have an M1 Mac mini, and it has three USB buses: one is labeled as a 3.0 bus, and it’s shared across two USB Type-A ports; two are called 3.1 buses, one for each of the two USB-C ports. Apple has deployed out-of-date terminology because the “3.0” bus should now be called “3.2 Gen 1” (up to 5 Gbps) and the “3.1” bus “3.2 Gen 2” (up to 10 Gbps).
The Mac mini also has two Thunderbolt/USB 4 buses, which, confusingly enough, also use the two USB-C ports: depending on what you plug in, the controller manages data over the appropriate standard at its maximum data rate.

In the screen capture above, you can see I’ve selected “Thunderbolt/USB4” and then the listing for Envoy Pro TB3, an SSD enclosure made by Other World Computing that contains an M.2 NVMe SSD card.
On this Mac, I’m testing a Satechi USB dock that includes a SATA-compatible SSD card slot. Even though it’s connected to a Thunderbolt 4 hub that is in turn connected to one of the Mac’s USB-C ports, because the dock has only USB 3.2 Gen 2 built-in, it shows up in the USB listing under the USB 3.1 bus. There, System Information shows the correct cabling was recognized as it shows the device can transfer up to 10 Gbps.
You can scan through various buses and listings to find your item; System Information only allows searching with the text of a selection, so browsing and scrolling are required. You might find USB-C devices under a “USB2.0 Hub” item, a sort of subset of the USB 3 bus. Apple’s “USB-C Charge Cable,” for instance, was designed for high wattage but only passes data at USB 2.0’s 480 Mbps. That cable shipped with most USB-C-equipped laptop Macs until recently.
System Information should report the speed of the cable rather than the speed of the device if you use a cable that isn’t rated for the maximum speed of the device.
Find the wattage
It’s a trickier matter to find out how much power a USB-C cable can pass, though you can start with certain assumptions. All USB-C to USB-C cables are supposed to be designed to allow up to 60 watts of power. That’s enough for nearly all Mac laptops to charge at full speed or while in use. Thunderbolt 3 and 4 cables are designed for either 60W or 100W.
In practice, you can find USB-C cables sold as supporting 15 watts and sometimes lower values, but avoid these—they’re out of compliance by design. Apple labels some of its USB-C cables as below 60 watts, but that appears to be related to how it tracks cables and paired adapters; they’re all capable of 60W.
(Note that only out-of-specification USB-C cables will attempt to pass power at levels above their design. If a cable is built to standard for 60W, plugging it between a 96W power adapter and a Mac that can pull in that much power won’t cause the cable to pass 96W. A Mac or other device’s power-charging system retrieves data about maximum power limits from the adapter and from the cable.)
More energy-demanding models, like the 16-inch M1 Pro/Max MacBook Pro, require more than 60W. If the maximum is 100W or less, a capable USB-C cable that supports USB-only or Thunderbolt 3 or 4 data will suffice. The 16-inch MacBook Pro’s 140W maximum power draw relies on a special MagSafe 3 to USB-C cable Apple designed. However, future USB-C cables will be able to charge devices at up to 240W using the USB Power Delivery 3.1 spec.
Apple’s System Information app and third-party apps seem to reveal only the capability of an attached charger, not the amount of power flowing or what a cable or adapter can allow through. That information is almost always printed on an adapter, although in illegibly small type or as molded black-on-black incised lettering.

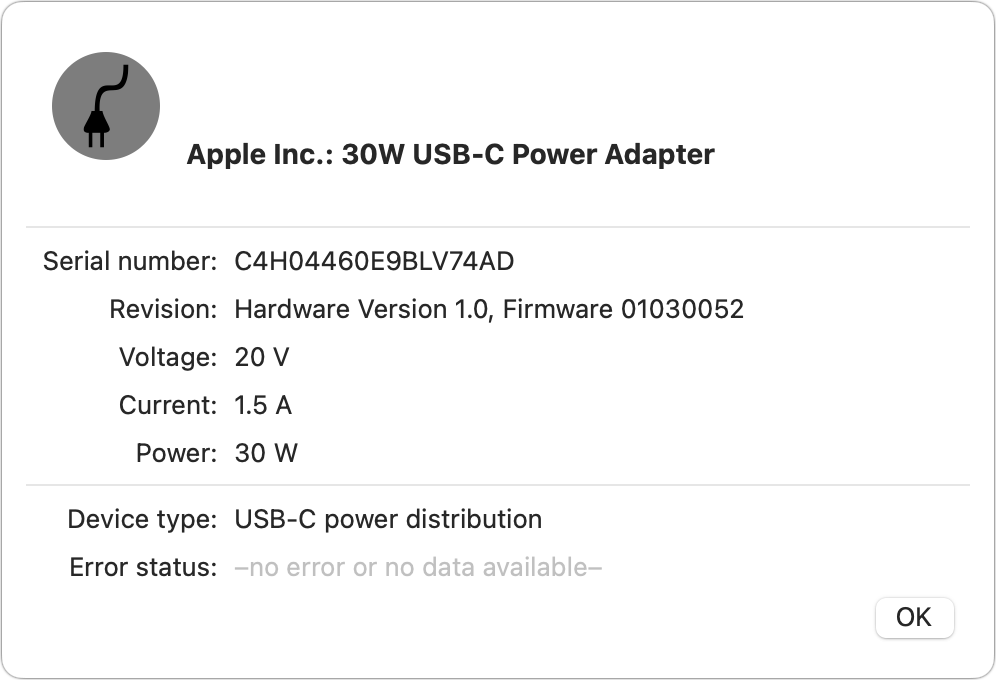
On a Mac laptop that’s plugged into a power adapter, launch System Information and click the Power link. Under AC Charger Information, you’ll see information provided over the USB Power Delivery standard. My M1 MacBook Air shows a “30W USB-C Power Adapter” that’s capable of 30 watts. But it’s silent about the charging level.
You could turn to Battery Monitor, a third-party app that reveals and tracks a wide range of battery information. But it’s mum about the cable and other details. The developer, Marcel Bresink, said via email that because his app is in the Mac App Store, it can’t pull up hardware details Apple doesn’t offer via a developer API. (Other battery apps lack this information, too, whether they’re in the App Store or not.)
However, Battery Monitor does let you track the charging rate on a Mac and reveals additional adapter charging specs. Connect a Mac capable of charging over 60W with a USB-C to USB-C cable to a 96W power adapter, and the app will reveal whether the Mac is charging at 60W or 100W—or an insufficient 15W on any Mac.
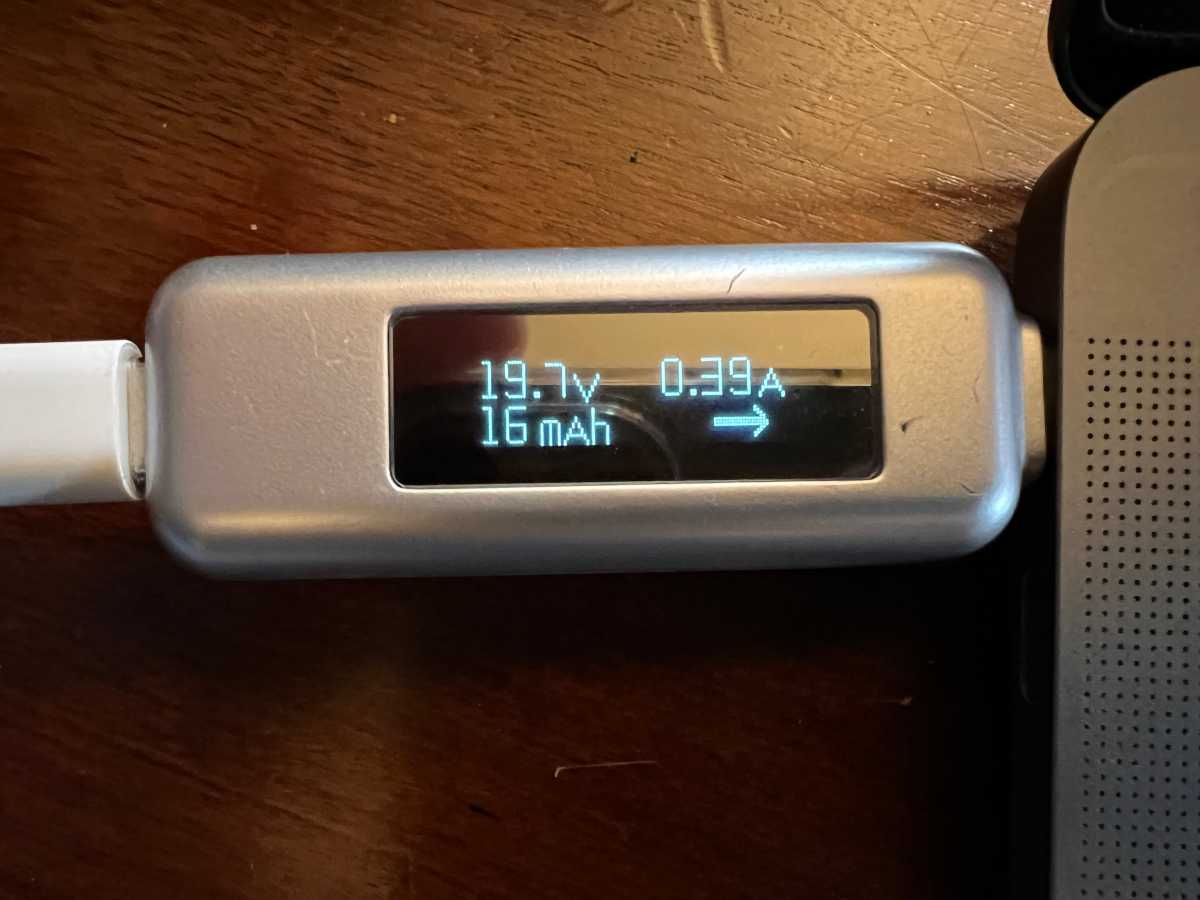
If you’re still stymied and need answers, you could opt to buy a USB power meter, allowing you to see the actual levels of voltage and amperage passing. Several models with elaborate data displays can be found online from about $20 to $70, although reviews of many of them include a lot of 1- and 2-star warnings about build quality; purchase from a site that allows easy returns.

This Mac 911 article is in response to a question submitted by Macworld reader Boris.
Ask Mac 911
We’ve compiled a list of the questions we get asked most frequently, along with answers and links to columns: read our super FAQ to see if your question is covered. If not, we’re always looking for new problems to solve! Email yours to [email protected], including screen captures as appropriate and whether you want your full name used. Not every question will be answered, we don’t reply to email, and we cannot provide direct troubleshooting advice.
For all the latest Technology News Click Here
For the latest news and updates, follow us on Google News.

