How to manage Time Machine snapshots using Disk Utility in macOS Monterey
Time Machine manages backups by creating snapshots that allow you to peer backward through time to select versions of documents, apps, folders, or other items that were later deleted or modified. Snapshots have a twofold purpose:
- They appear to represent all the files on the disk, allowing you to browse through the structure you know.
- They are compact, however, containing only the differences between the current state of your macOS startup volume and the last set of files stored. The first snapshot is, effectively, a full backup; the ones that follow, partial ones.
For some users, these snapshots can grow out of control. Readers write in regularly asking how to get rid of snapshots that fill their startup volume, making their system nearly unusable. I’ve provided answers in previous columns, such as “How to delete Time Machine snapshots on your Mac” and “How to fix your mysterious Mac storage problem.”
If you had a modern Mac, one running the APFS filesystem Apple began to introduce in macOS 10.12 Sierra, and were backing up to an APFS-formatted Time Machine volume, you had few tools at your disposal, as Apple relied on a different approach with its long-running HFS+ filesystem.
With macOS Monterey, Apple updated the Disk Utility app and its command-line counterpart to help manage APFS snapshots, whether created by Time Machine, Carbon Copy Cloner, or other software.
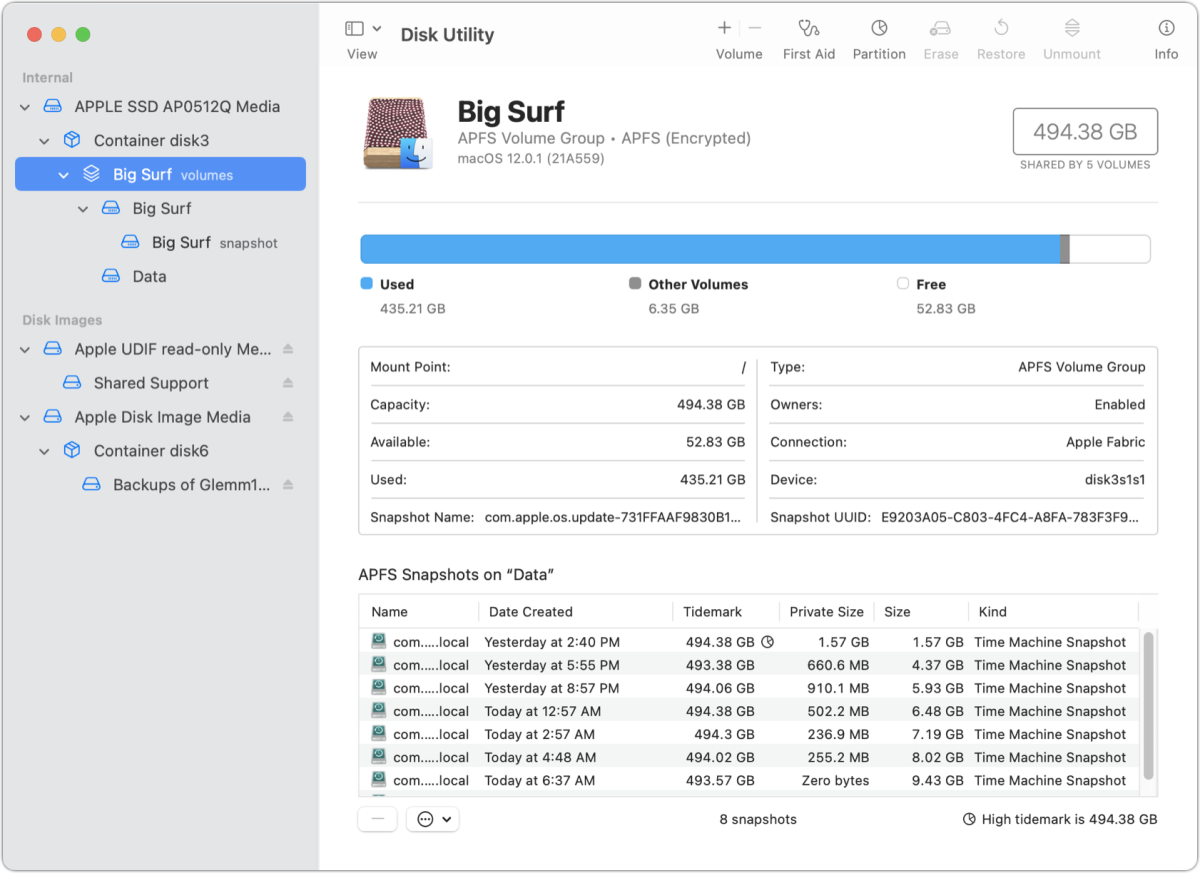
You can view snapshots by following these steps in Monterey with Disk Utility version 21:
- Launch Applications > Utilities > Disk Utility.
- Select your startup volume in the left-hand sidebar; with Catalina or later, select the volume group, labeled as “volumes.”
- Choose View > Show APFS Snapshots.
At the bottom of the volume view, you can see all the snapshots made for that volume. Double-click any snapshot, and it mounts in the Finder as a browsable volume. This can be much easier than using Time Machine to find a given set of older files.

You can select any snapshot and click the – (minus) button beneath the list to delete it. Warning! This is irreversible.
To get a little more information in the list, click the … (More) button and choose Show Columns > Private Size. This reflects the actual space occupied on the drive by the snapshot. This is in contrast to the “Tidemark,” a term Apple doesn’t seem to define anywhere, but which appears to be the total storage required for the entire set of files for the drive, not just the ones represented in the snapshot.
(Howard Oakley of Eclectic Light initially documented this solution and credits being tipped to it by someone else. Visit his article for more technical details, including how to use command-line options with tmutil.
Ask Mac 911
We’ve compiled a list of the questions we get asked most frequently, along with answers and links to columns: read our super FAQ to see if your question is covered. If not, we’re always looking for new problems to solve! Email yours to [email protected], including screen captures as appropriate and whether you want your full name used. Not every question will be answered, we don’t reply to email, and we cannot provide direct troubleshooting advice.
For all the latest Technology News Click Here
For the latest news and updates, follow us on Google News.
